Category Archives: Cooking

Easy Homemade Eggrolls

Standard

Every time I would hear someone talk about making egg rolls at home, I’d think they were nuts. I’d only ever heard that they were such a pain and take forever to make. My mom and I decided to make them one day while we were up visiting, and it turns out if you “cheat” a bit – they’re really not so bad!

IMG_1861Still, I’m not adding this to the “quick meals” section because it does involve a fair amount of preparation, but for those of you who are much faster at prep than I am, it could definitely be a quick meal if you’ve got all the ingredients on hand.

What you’ll need:

– Egg roll wraps (found in the produce section at Walmart and Target)
– 1 bag of coleslaw mix – this is the cheat – it’s already cut up and just about ready!
– 1lb ground pork
Ginger to taste (also in the produce section)
– 1 medium onion, chopped
– Teriyaki sauce, to taste

Simple, right? Six ingredients, unless you plan to deep fry, in which case you’ll want to make sure you have enough oil on hand.

So to start, fry up the pork with the ginger. Since I buy the squeeze tube of ginger, I just squeeze a bunch on. We like ginger, so if you’re not sure, put about a teaspoon in, then taste when the pork is fully cooked. You can always add more after you add the onions.

Add the onions after the pork is cooked, and continue to fry until the onions are soft.

While everything is frying, toss the coleslaw mix into a food processor. I love my Tupperware Quick Chef for this (thanks Mom!) – I spin half the bag first and then the rest, as my Quick Chef is the original and it’s not quite big enough to handle a full bag. Put the chopped up mix into a large bowl.

IMG_1858Once the fried pork and onions is done, add it to the coleslaw mix, and stir in the teriyaki sauce. I would start with 2 tablespoons, but definitely taste the mixture to see if you want more. Stir it up, and your egg roll filling is complete!

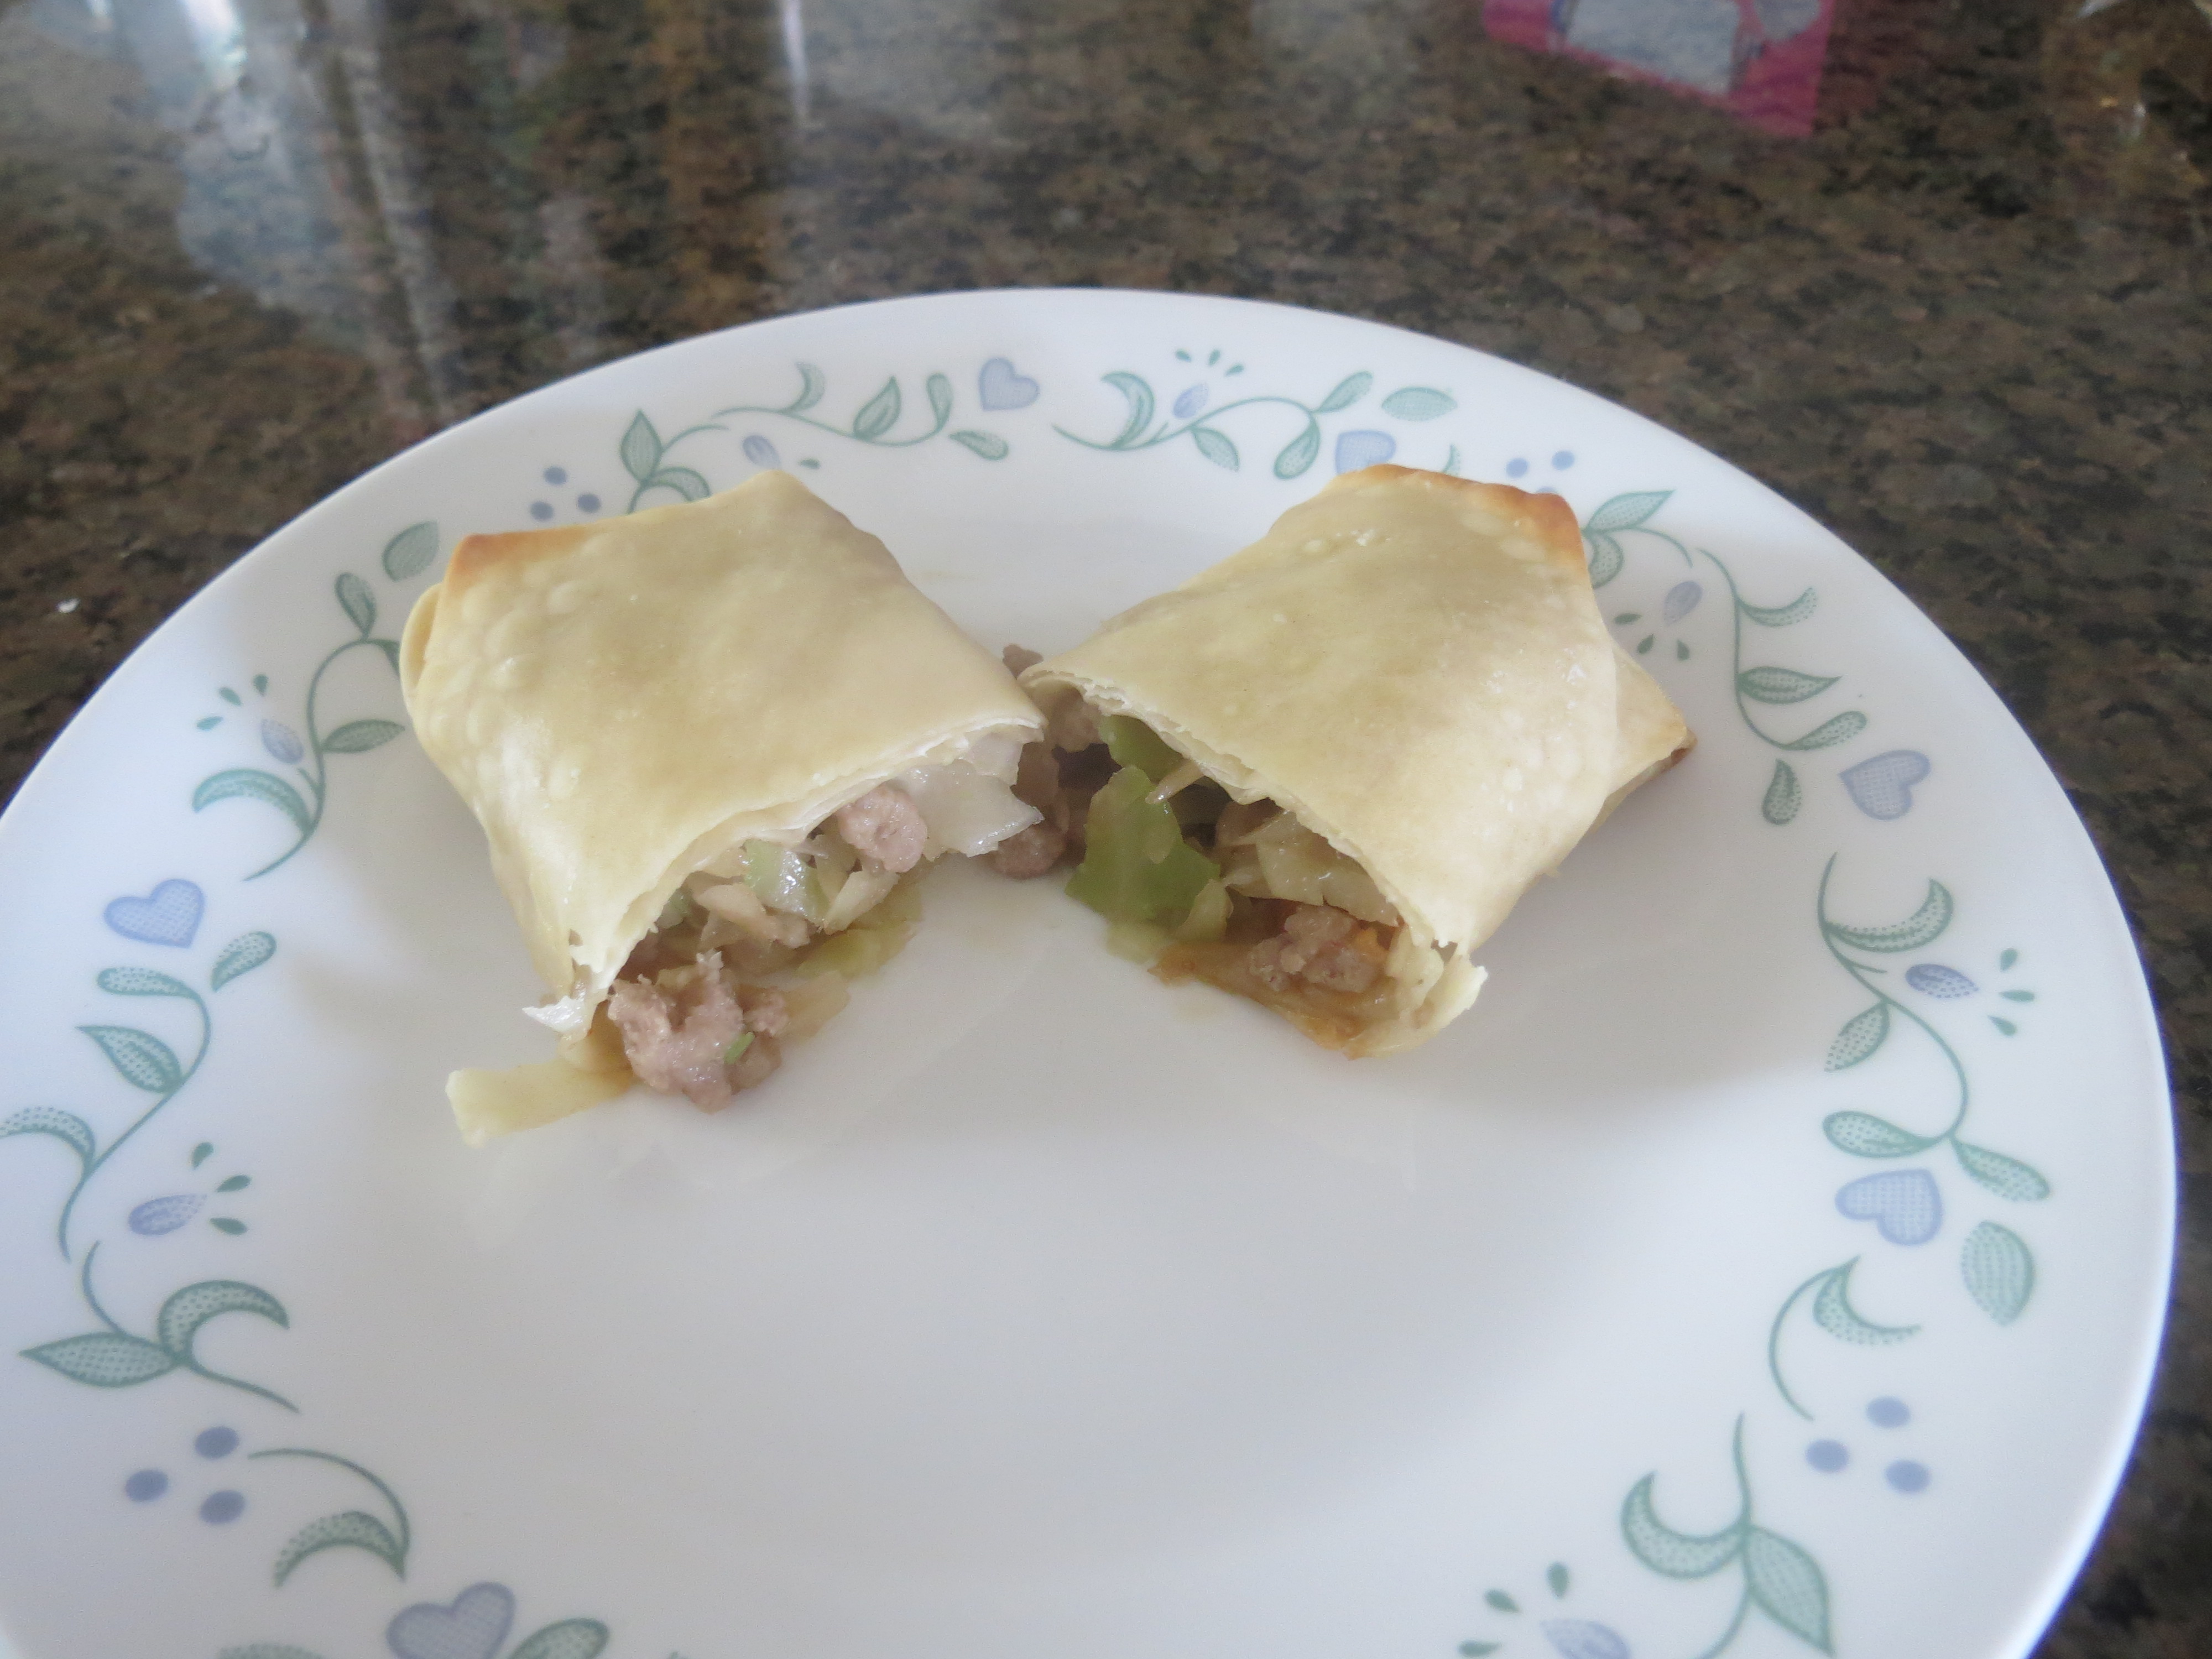
Now the fun part: making the actual egg rolls.

Preheat the oven to 400 degrees (or get your oil and your deep fryer ready). If you’re baking them, spray a cookie sheet with non-stick spray.

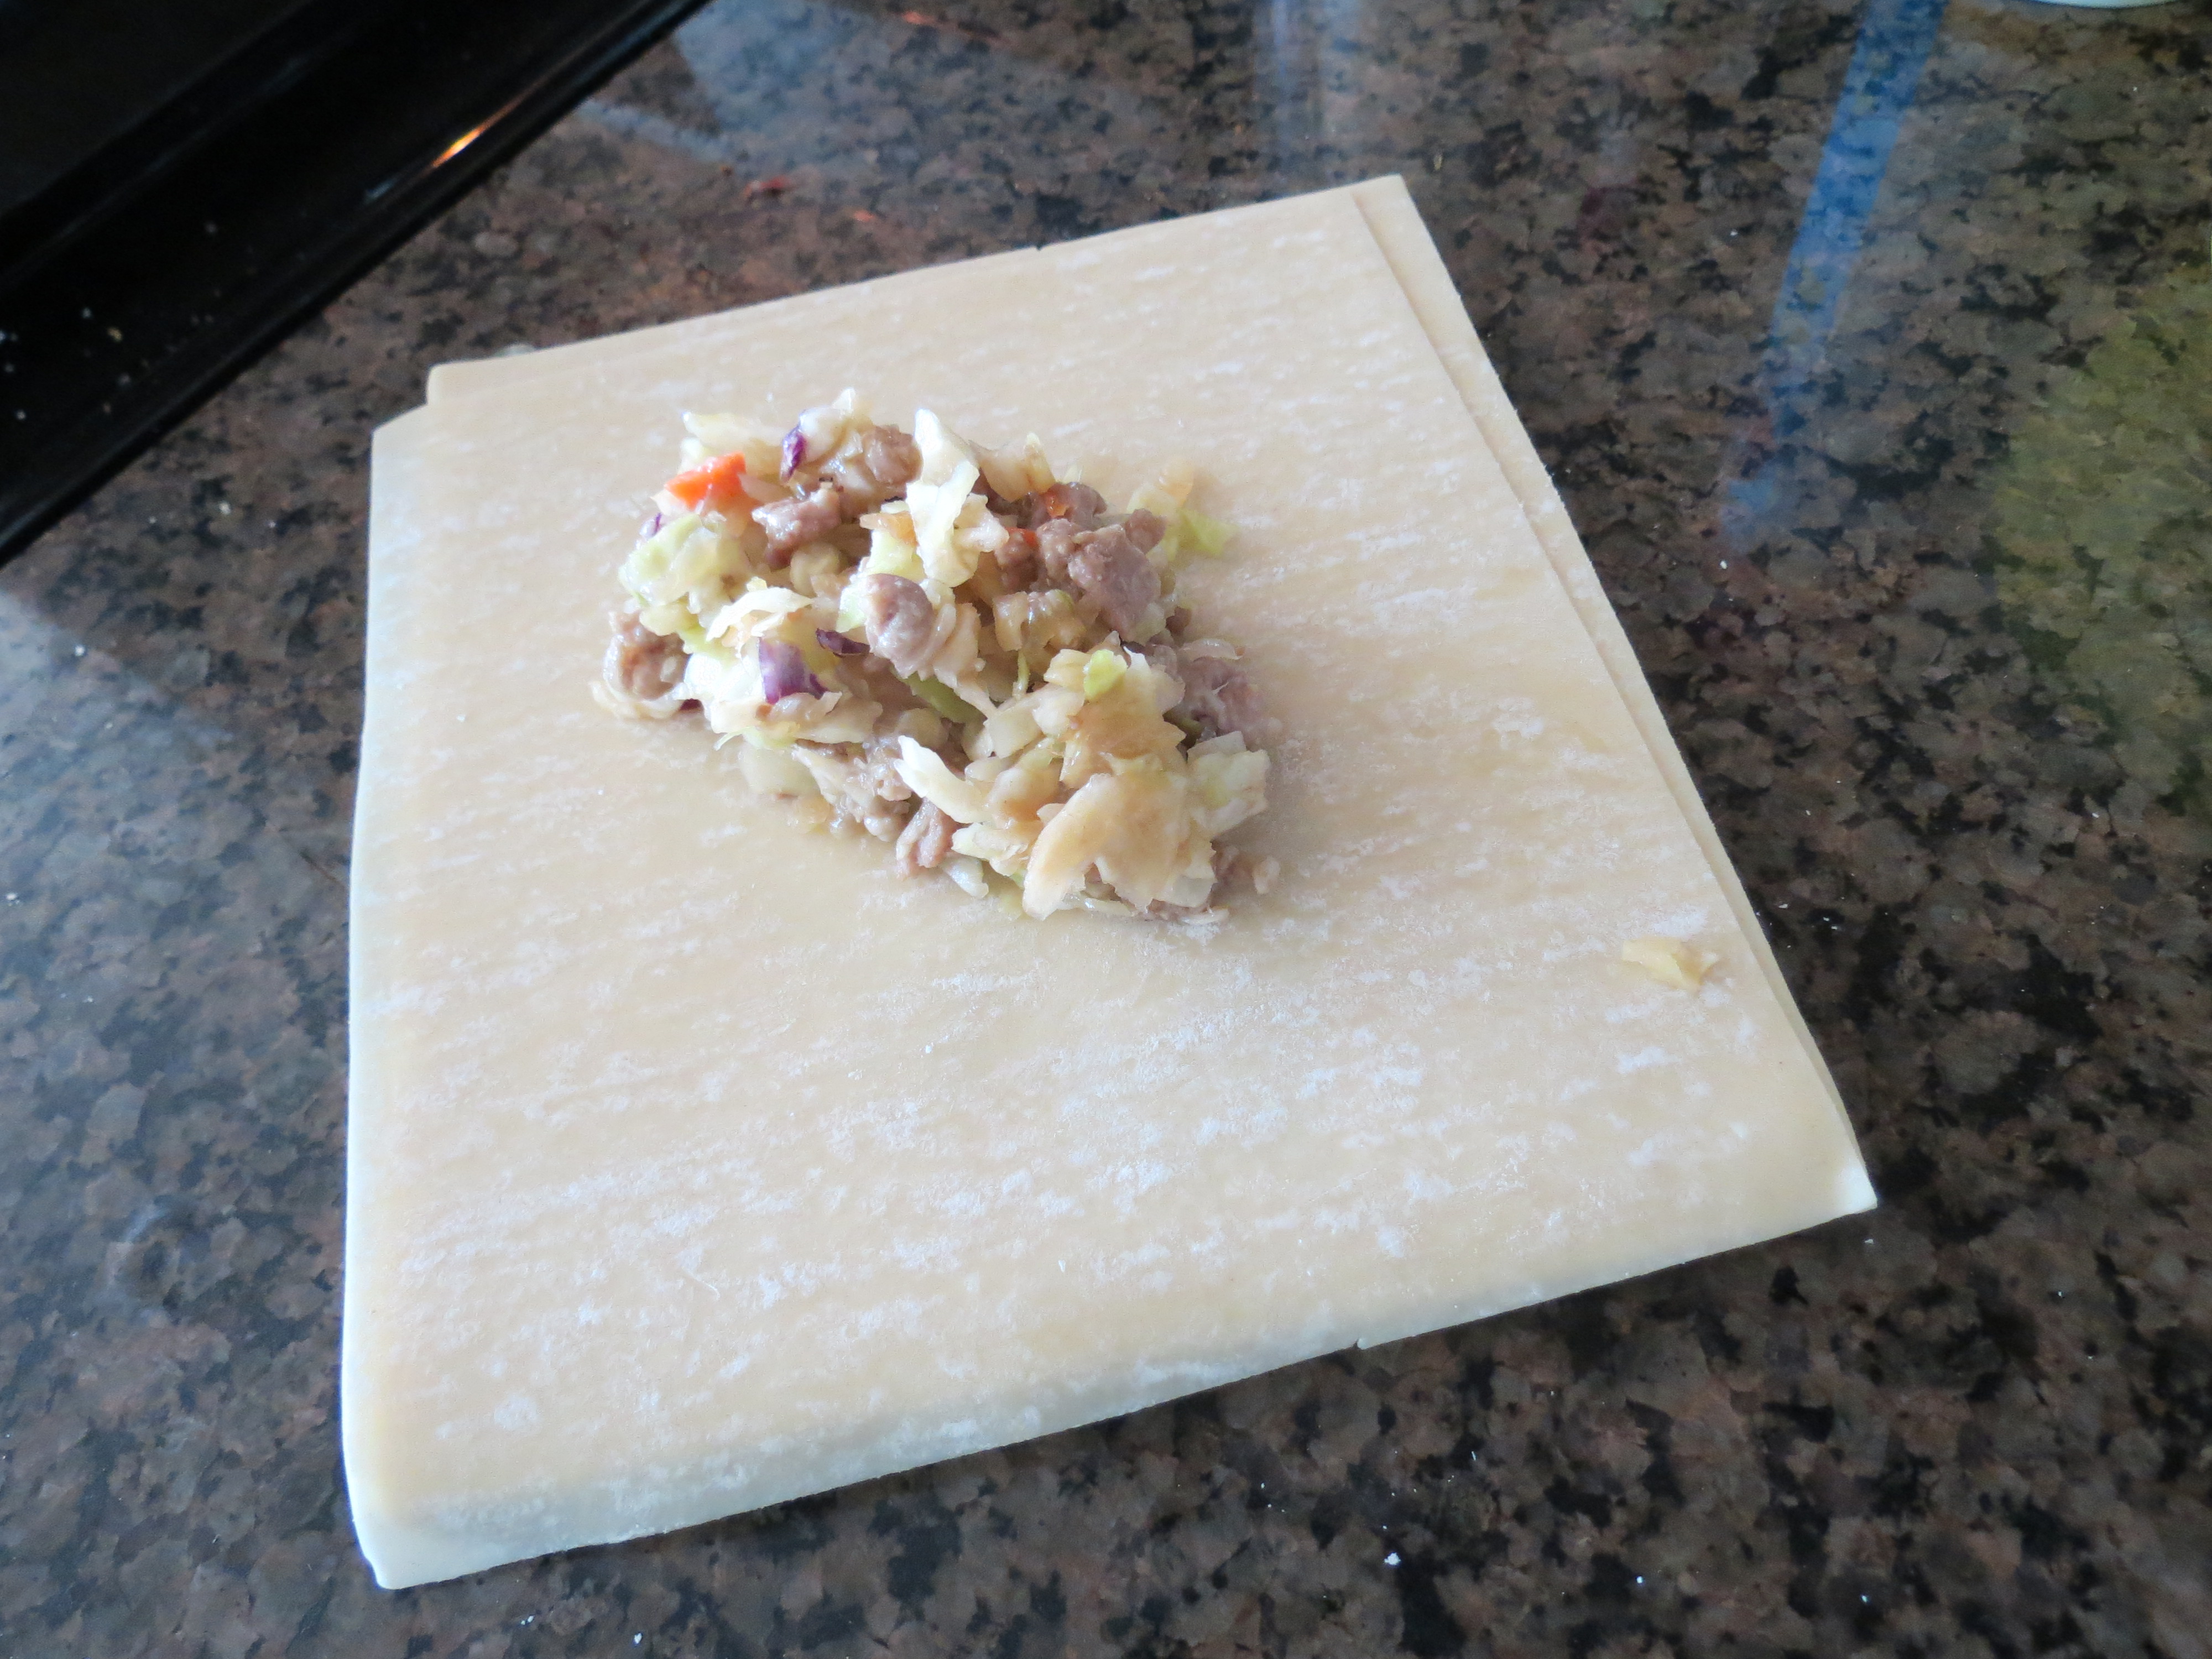
Put about 2 tablespoons of the mixture onto the eggroll wrap – you’ll get a feel for how much can go in the wrap as you start to fold them.  I start by folding up the bottom corner, then folding in the sides, and then pulling the top down over everything. I keep a small bowl of water next to me so I can dip my finger in it, then get the top corner of the wrap wet, and “seal” it to the roll.

When I put the rolls on the pan, I try to put the side with the sealed corner down – this just makes me feel like it will stick together better and not dry out and come apart while baking. If you’re really worried about it, you can use a mixture of flour and water to help glue it together, but the wraps do have flour on them already so this shouldn’t be necessary.

Coat the tops with olive oil, and bake for 10-12 minutes or until the tops are golden brown.

The package of wraps that I bought had 21 wraps, and the mixture I made was more than enough for 21 wraps. The mixture alone is pretty tasty, but you have to like raw cabbage!

Quick meal #3: Pasta salad

Standard

This is an absolute cheat of a meal because it’s made from a box with a few added ingredients, but it’s quick and the kids gobbled it up!

Now that the weather has gotten nicer, the vegetables at the grocery store are starting to be better quality and taste a lot better. My kids love fresh veggies, so a pasta salad is with added veggies is almost a treat for them, especially after a long winter of sub-par quality vegetables.

What you’ll need:

– 1-2 boxes of Suddenly Salad (Walmart has extra big “Value” boxes right now that are perfect for a family of 4-6)
– vegetable oil (olive oil would likely work here as well, but it does change the taste slightly)
– water
– vegetables of your choice
– breadcrumbs – plain or seasoned
– grated Parmesan cheese

This is about as simple as you can get in a recipe. Cook the pasta as directed on the box (boil for 12 minutes). While the pasta is cooking, mix the oil, water and seasoning packet according to the directions. Also, chop up your veggies. Last time I made this we had cucumbers and peppers, so I went with that – but I also like using cherry tomatoes and black olives in this salad as well.

Drain the pasta, and rinse with cold water. I like to get the water as cold as I can, because we will eat this right away. Make sure the pasta is well drained, then add it to the bowl you’ve mixed up the seasoning it. Dump in the chopped veggies and stir well.

Once everything seems to be coated evenly, add in the breadcrumbs and Parmesan to taste. Beware: if you add too much of the breadcrumbs, the salad will get a bit “gummy” as it sits – so add a little bit and then if you still want more, add it to individual bowls before eating.

We’ve eaten this as a meal on its own for days when we had a heavy lunch, but it can also be a side, of course. Another way to make this a bit more rounded of a meal is to add chicken. It was a bit too hot to grill chicken when I made the salad, so we just had salad, a side of fruit and cold lemonade, and everyone was happy!

Quick meal #2: Cheesy Quinoa

Standard

Quinoa has become something we make just about once a week – high in protein and quick to make, it’s a great substitute for rice and even better as a side dish for those nights when you’ve forgotten to take the meat out of the freezer.

AroundTheTableRI.blogspot.com

AroundTheTableRI.blogspot.com

Recently, I came across this Cheesy Quinoa recipe on Pinterest,  and thought this might be a good recipe to try out.

While we like quinoa, the girls tend to think it’s much more fun to play with – and cleaning it off the floor is just as much of a pain as cleaning cooked rice grains off the floor! This recipe makes the grains stick together (in a very tasty way!), making it easier for the girls to eat and much less of a hassle for cleanup.

The longest parts of this recipe are cooking the quinoa and baking the final product. You can cut down on the quinoa step by having it pre-cooked – I make quite a bit when I make it so that we can use it in other things throughout the week.

However, 15 minutes isn’t a huge deal, and that time can be spent chopping up veggies, since the quinoa pretty much cooks itself.

I’ve modified the recipe from the link above a bit for our tastes, and also to reflect the veggies we had on hand. You can skip the veggies or use just about anything you have on hand. Here’s what we used:

– 1.5 cups cooked quinoa
– 1/2 cup fresh mushrooms, chopped
– 1/2 red bell pepper, chopped
– 1/2 green bell pepper, chopped
– 1/2 medium onion, chopped
– Progresso Garlic & Herb breadcrumbs*
– 2 large eggs
– 2 cloves garlic, minced
– 1 cup milk
– 1 1/2 cups shredded cheese (we used mexican blend)

While cooking the quinoa (here’s my “special method”), preheat the oven to 350 degrees and chop up the veggies. Lightly saute them – just enough to get them started softening.

Next, whisk the eggs and milk together in a bowl large enough to hold everything. Add in the veggies, quinoa and cheese – mix until everything is coated with the eggs.

Transfer to a greased baking dish of your choice – I used a 9×13 casserole dish and it was perfect. Sprinkle breadcrumbs over the top. Bake for 30-35 minutes.

This recipe took me about 45 minutes from start to pulling it out of the oven, which is pretty impressive for me!

* If you need gluten-free, you can eliminate the breadcrumbs.

My “special” quinoa recipe

Standard

I like to call this a “special” recipe, but really it’s probably something most people with cooking skills would do anyway – but for those of you who are learning like me, I’ll share just in case!

Quinoa (with sweet potatoes)

Quinoa (with sweet potatoes)

If you’re wondering where to get quinoa, it’s getting much easier to find it. I’ve been buying ours from Costco, simply because the package is large and I don’t particularly care for grocery shopping, so I’d prefer to have enough to last me awhile.

Anyway, back to my recipe. Quinoa is made similarly to rice – the ratio of water to grains is 2:1. I like to make four cups of quinoa (cooked measurement) at a time so that I have enough for different recipes and meals. One cup of dried quinoa puffs up to four cups of cooked, so the recipe is pretty simple:

– 1 cup quinoa
– 2 cups water
– 2 chicken bouillon cubes*
– 1/4 cup dried onion flakes

Add all ingredients to a medium saucepan. Bring to a boil over medium heat. Once boiling, cover and set the timer for 15 minutes. Towards the end of the 15 minutes you may want to lift the lid to check – once the water is absorbed by the quinoa, it’s finished – and you don’t want it to burn.

*Alternately, instead of water and bouillon, you can just use 2 cups of chicken broth if you have that on hand. Some people prefer vegetable broth, and I’m sure you could use beef broth, but I like chicken the best so far. I like bouillon because it’s in a much smaller package than the carton broth that I would buy otherwise.

So, do you have to add onions and broth? Absolutely not. In fact, for some recipes (like breakfast cereals), you would just want to make it with plain water. I like to make it with the extras because it can then stand alone as a side dish if I’m feeling particularly lazy. For most dinner recipes, the extra ingredients just add to the flavor.

Quick meal ideas from a slow cook

Standard

I’m not particularly fast at cooking – part of the reason I’ve probably never really enjoyed it much. There have been many times we’ve ended up eating out or picking up fast food because I don’t plan enough in advance (apparently pork chops take 2-3 days to defrost in the fridge??) or because I have a recipe in mind, and then when I start to get everything together and really read the recipe, I see that it’s going to take 2 hours (which in my world is about 4 hours).

OverworkedSupermom.com

OverworkedSupermom.com

This is still a struggle for me, but not as much as it used to be. Having kids has forced me to  learn a bit more about cooking, and through trial and error I’ve managed to come up with some tricks to shorten preparation time, or even just some go-to quick meals that I can even involve the girls in the preparation.

I know I can’t be the only one who struggles with this, so I want to share these tips and meal ideas here to hopefully help those who want to keep on a budget and cook at home more. Be forewarned though: most, if not all, of my ideas involve *some* kind of packaged food – this  isn’t all from scratch.  I am pretty careful about what kinds of packaged foods I buy, so overall the meals should be fairly healthy.

Likely you won’t find anything new, or innovative (I’ve got a ways to go before I can be that kind of cook!), and you may even see some ideas you’ve seen elsewhere. Pinterest has been a great source for me on this (with plenty of failed experiments as well!)

To make this easier in case my list gets long (it’ll be awhile), I’ll add to this post and link to the ideas as I’m able to post them.

Ham, veggies and rolls
Cheesy Quinoa
Pasta Salad w/ Veggies
– Montreal steak and veggies on the grill
– Goulash
– Mexican goulash (Taco pasta)
– Easy fried pork chops

No canned tomatoes… so, then what?

Standard

Since canned tomatoes are one of the products that has the highest amounts of BPA (due to the acidity of the tomatoes, more lining is necessary on the cans), they were one of the first things I got rid of out of my cupboard. As someone who didn’t have a ton of experience in the kitchen, but tended to use a lot of canned tomatoes in what I did cook, this was without a doubt the hardest part about getting rid of BPA for me.

Just as an example, here are a few of the “staple” meals in our house before I began this journey:

– Chili (stewed tomatoes)
– Goulash (diced tomatoes &  tomato paste)
– Spanish rice-a-roni (diced tomatoes)

So, what are the options if you don’t use canned tomatoes?

Fresh tomatoes – this would be ideal, right? Garden fresh (or grocery store fresh) tomatoes for all meals requiring tomatoes. Except… who has time to blanch, skin, and slice tomatoes before making a meal that would otherwise only take 15-20 minutes to make?  This was not an ideal solution for me – I tend to decide what I’m cooking about 5 minutes before start. Besides, fresh tomatoes aren’t always the best year-round.

BPA-free cans – Muir Glen, a General Mills family product, announced in 2010 that they’d be switching to BPA-free cans for their tomatoes “at the next harvest.” In 2011 I came across an article that pointed to these being in stores. I apparently don’t shop at stores that carry this brand, as the only time I’ve ever seen them was when I was working at the General Mills headquarters and I stopped by their on-site store. One thing that makes me nervous about these is that they still have to be lined with something due to the acidity of the tomatoes. Muir Glen/General Mills, as far as I know, haven’t provided info on what they’re lining the cans with now.

Alternate commercial packaging – jarred tomatoes and tomatoes in cartons (or Tetra Pak) are the two options I found here. Both are surprisingly hard to come by. In fact, I have never seen either option at Target or Walmart. I did find tomatoes in cartons on Amazon from Pomi. The downside to these is that they’re expensive, and they don’t come in the traditional sizing that canned tomatoes are in, so you have to plan a bit when following a recipe. I also haven’t been able to find them locally. The company seems pretty committed to providing a quality, BPA-free tomato product, and so far they’ve got an A+ in my  book.

Stewed tomatoes

Stewed tomatoes

Home canned (jarred) tomatoes – my mom and I canned about 40lbs of tomatoes this past fall. My mom has canned many times, but this was my first time participating as an adult. It wasn’t the most awesome experience ever, but it also wasn’t horrible, and I’ll be doing it again this fall – hopefully with home-grown tomatoes. We made stewed tomatoes and tomato soup. Besides the time and effort needed for this, a downside again is that the jars aren’t the typical sizes called for in recipes. I am aware that the lids of these jars contain BPA, but since I personally canned them, I know that the tomatoes didn’t touch the lids. There are BPA-free lids that can be used, but from the research I’ve done, I want to be a bit more experienced with canning before I use them.

Frozen tomatoes – this is an option I need to explore a bit more. Though my freezers are currently close to capacity (some organization would likely help!), the convenience of having tomatoes in the freezer might even be worth adding another freezer.

So – there are definitely options if you decide to get rid of the cans in your home. As you can see from my descriptions, I use several options together – sometimes certain options work better for a recipe than others. It’s all pretty much trial and error – hopefully this post will eliminate some of the error for others!

Stir Fry Disaster

Standard

Last night I decided to try a stir fry. I’d been eyeing up the Spring Stir Fried Chicken recipe on SkinnyTaste.com since I saw it, and even though I’ve never done it (and didn’t own a wok until Saturday), I figured it was worth a try.

Overall the dish turned out to taste pretty good, but it wasn’t a pleasant cooking experience, and once again I’ve been reminded that the answer to “How hard could it be?” is sometimes “actually… harder than it looks!”

Before I describe what happened, let me preface by saying I followed the recipe to the letter (other than I doubled the ingredients – wanted some leftovers for lunches!)

My first “oh crap” moment was when I added the oil to the pan before frying the chicken. It was snapping and popping all over the place – I couldn’t get within 3 feet of the stove because the oil was exploding everywhere!

Stir FryFast forward to frying the veggies – same deal with the oil, only this time, because there was leftover chicken fragments in the pan still, not only was oil exploding everywhere, but everything started to smoke. I was worried that I’d set off the fire alarms, or worse – have a grease fire on my hands.

In the end, the stove and surrounding counter, floor and walls were splattered with grease, the house was a bit smoky, but we had an enjoyable meal. After poking around on the internet I’ve come to the conclusion that one of the following things (or a combination) was my problem:

– The wok was too thin (can we say cheap?)
– The wok was too hot
– The wok was not hot enough?
– I used the wrong kind of oil (again, followed the recipe)
– Stir frying is too complicated for me

I’m going to settle on the last option – we may not be eating a lot of stir fries in the future (at least not home cooked stir fries)!

Mmmm… Spaghetti (squash)

Standard

Last summer we subscribed to a CSA (community supported agriculture), and every week we received a box with fresh, locally grown vegetables. While we’ve decided that we won’t be doing it again this year, we learned quite a bit from the experience. For example – it IS possible to have too much eggplant and kale!

Forest & Kim Starr / Wikipedia

Forest & Kim Starr / Wikipedia

One of my favorite new vegetables (I guess technically it’s a fruit, but we’re going to go with vegetable here) is the spaghetti squash. I’d never heard of it before, and actually didn’t even know what it was when we got it. I was skeptical about it, and was leery of tasting it the first time – but it turns out that it’s a great addition to our diets, and I’ve been buying almost one a week from the grocery store since the beginning of this year.

According to Wikipedia, the spaghetti squash contains folic acid, potassium, vitamin A and beta carotene, along with lots of other nutrients. One cup averages about 42 calories, and it’s super filling!

Preparing the spaghetti squash is similar to other squashes, but when you scrape the squash out of the rind, it comes out in rounded strands. I’ll post a picture after I scrape out my latest batch.

The hardest thing about dealing with spaghetti squash is that it’s ridiculously hard to cut, especially if you don’t have a sharp knife, or even the right type of knife. I did a little research, and found that it’s possible to cook it without cutting it first, but it takes quite a bit longer. I usually bake mine for at least an hour when cut in half, so I wasn’t really interested in upping the cooking time (in my life, anything that takes longer than an hour to cook is a rare thing on our plates!).

I found the easiest way for me to cut the squash is to cut it in half the short way first. I then scoop out the seeds, and cut the halves one more time. It shortens the cooking time slightly, but most of all I don’t feel like I’m going to chop my hand off in the process (and it doesn’t take just as long to cut as it does to bake).

My favorite way to eat the squash is just with a bit of Classico alfredo (four cheese or roasted red pepper) sauce mixed into it. I never would have thought of putting a cheese sauce on squash, but it tastes great and it’s better for you than pasta!

I’ve started to research how to store this so I’m not baking one up every week. Freezing seems to be the best route – I’ll update when I try it and when I use the first frozen batch!